Pixel
Ever since we bought our first house, I've wanted to build a trailer to leave the house behind. I've documented the entire process here.
2012-08-20: Jack
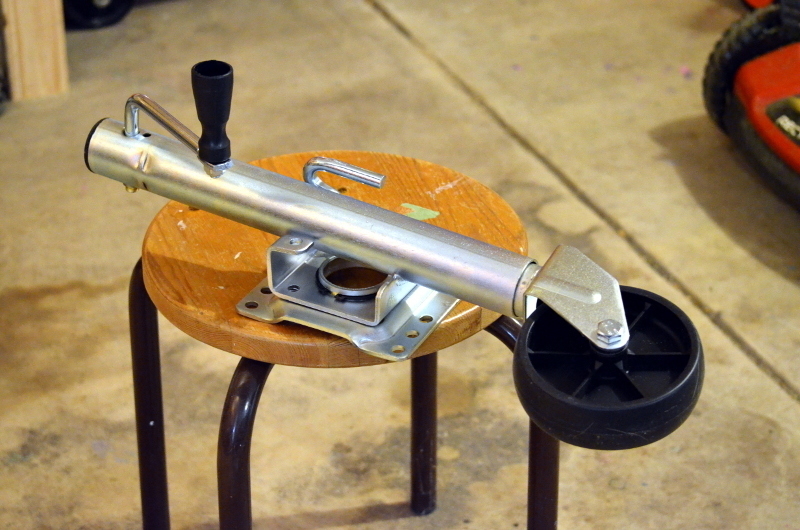
This is a Reese swivel jack (model #74410), the first part I bought that has arrived! Looks kind of lonely there without a trailer to hook it up to... I probably won't post a picture of every part, but this one is special since it is the first one. I am currently awaiting the next few initial parts I ordered online including a 5'x8' trailer frame, rear corner levelling jacks and wheel chocks. This will be one stationary mofo.
2012-08-23: Helpers
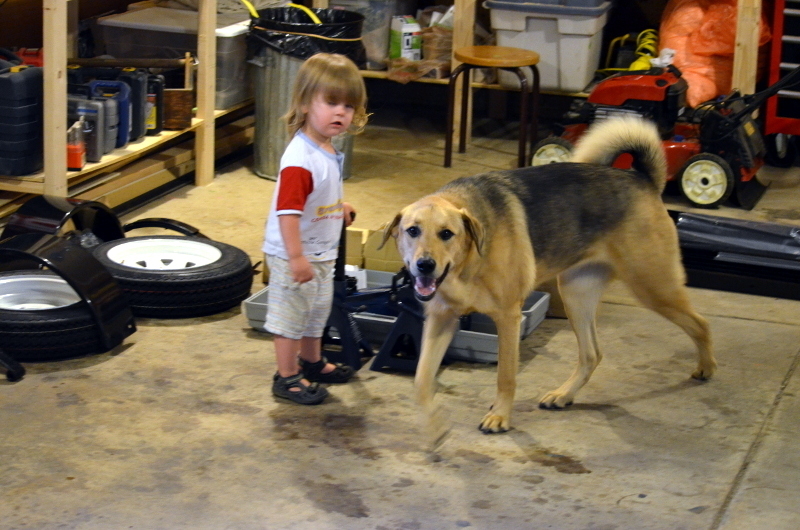
If you notice tools and parts strewn about, ask these two, they may know something about it. Yes, Alexander got a haircut.
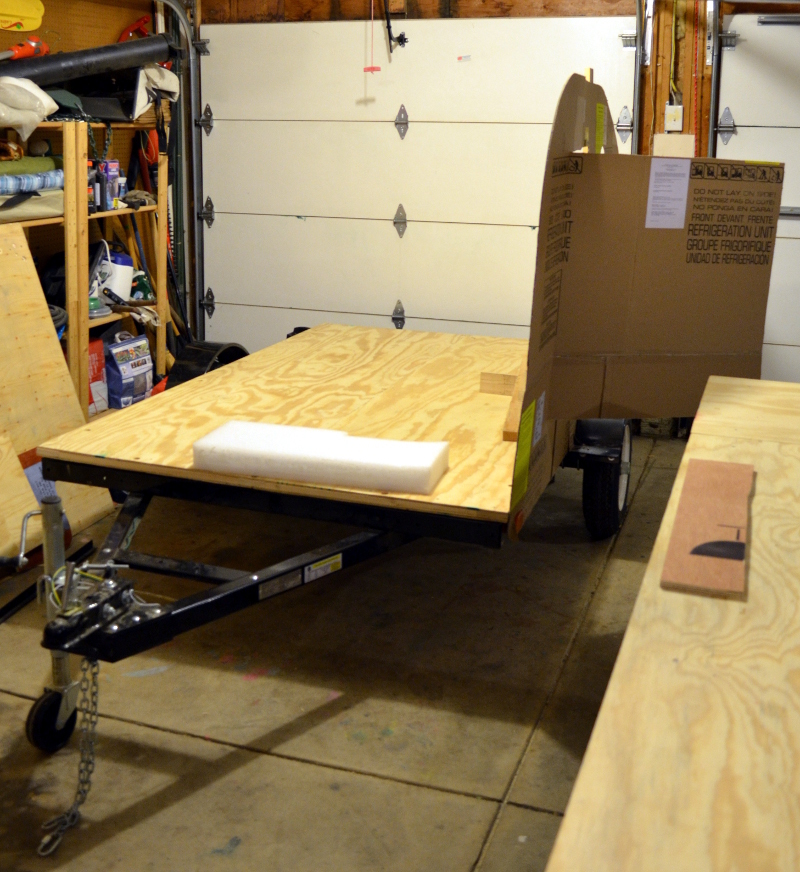
2012-08-23: Trailer
The trailer arrived today. It's the 5'x8' bolt together kit from Northern Tool. My plan is to leave it stock for now then evaluate whether I should do things like add shocks or extend the tongue later on in the effort. Also on the todo list right now is to build a table to raise the work zone to a more comfortable height.
2012-08-24: Tire Space
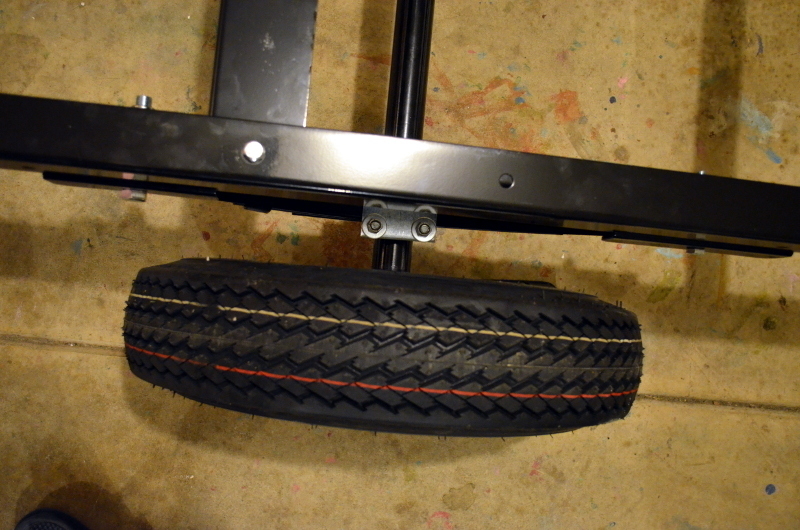
There's about 3 inches of space between the tire and the frame, so I should be able to drop the walls down between them without having to modify anything. The 12 inch wheels look a bit cheesy, but I am going to leave them for now. I may paint the white wheels at some point, though. First I need to finalize a design and pick finishes and if necessary, colours.
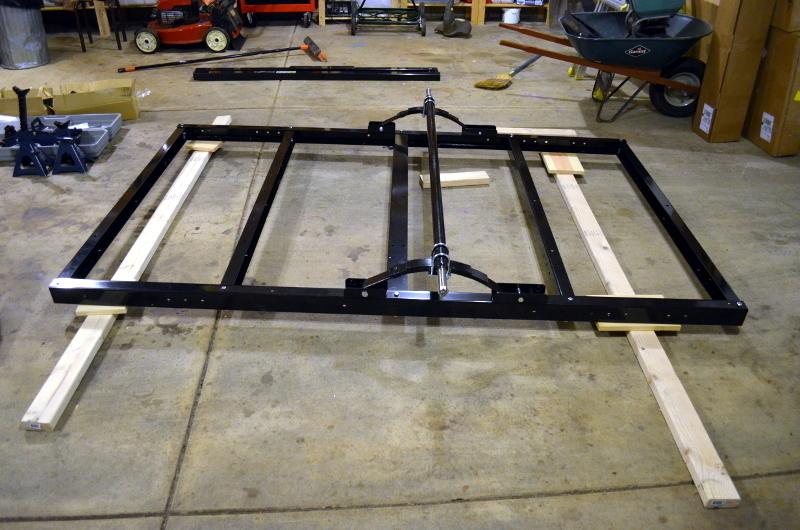
2012-08-27: Trailer frame complete
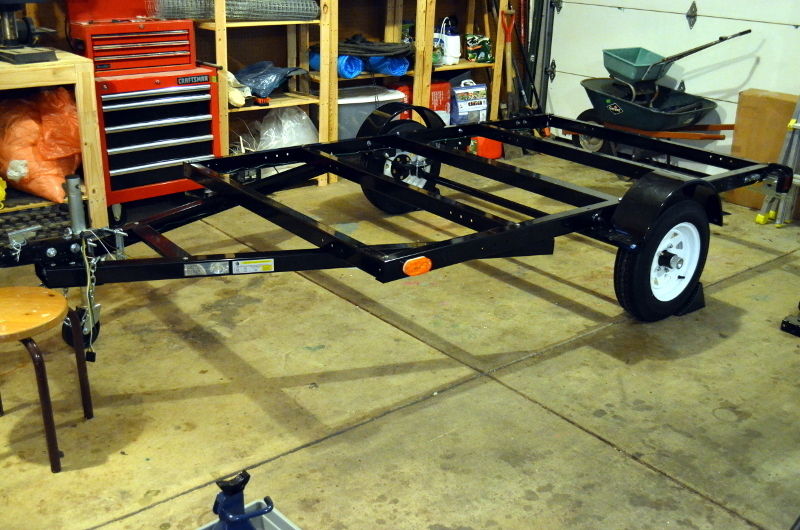
The trailer frame is now complete. It is surprisingly sturdy, so much so that a welded frame would have been overkill. I can stand on the outside edge of it and it doesn't flex at all. I built it complete with lights so that I can use it to haul the lumber and plywood necessary for constructing the body. I plan to leave it in this condition until I am ready for final assembly at which point I will remove the cheap wiring and lights as well as the fenders. I will attempt to reuse the fenders by mounting them directly to the body of the trailer. I have not yet decided if I will be reversing the mounting of the axle on the springs to lower the trailer body. That's another design point I need to work out. Looks pretty easy to do though.
2012-09-05: Hitch
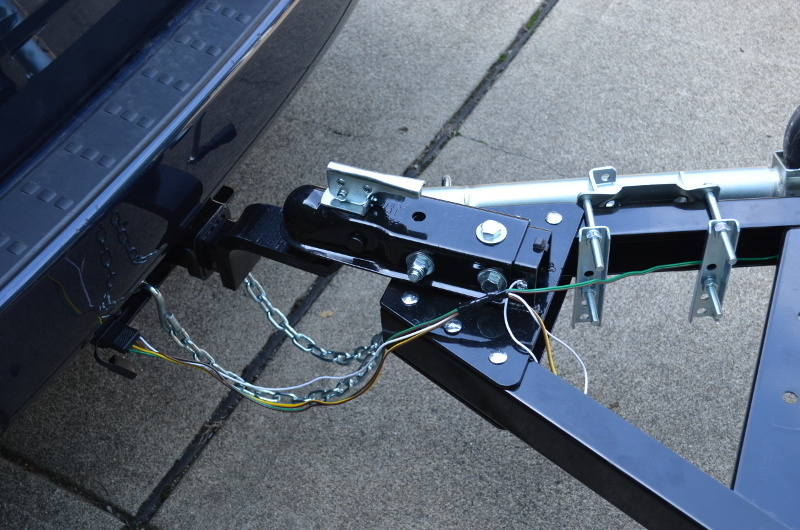
The wiring worked perfectly, but I left the 4 pin hookup just a couple of inches too short. Some quick relocation of the wire hangers and its all good. This wiring only needs to last a few weeks as once I have registered the trailer and used it to buy the lumber I need to build the frame, I will be removing and replacing all the cheap lighting components that came with it. I will probably swap out the chain for something of higher quality too.
2012-09-07: Layout
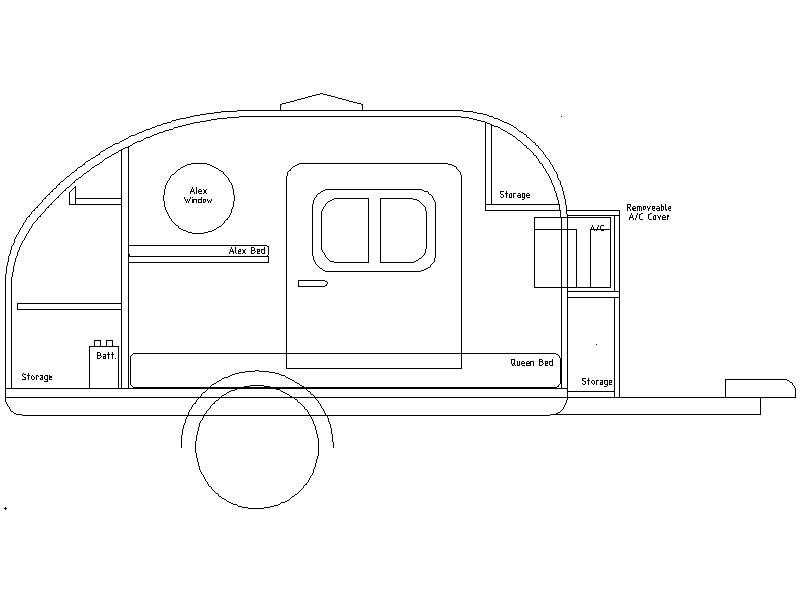
I think I have the layout we want to use complete. I've got a 74" long bed for Adriana and I, plus Alexander gets a 60" shelf (plus his own windows!) and I think I have even come up with a way to make room for Pax too. I ended up not putting in the upper storage area as it would have taken up too much space.
2012-09-05: Lights and Level
Finally got the hitch installed and surprisingly, the lights all work perfect first time. Brake, turn and running lights all function. Also, the trailer rides fairly level. The tongue could use a couple of inches lift, though. I am considering using a tongue extension and if I do, this will add that couple of inches.
2012-09-09: Paint Schemes
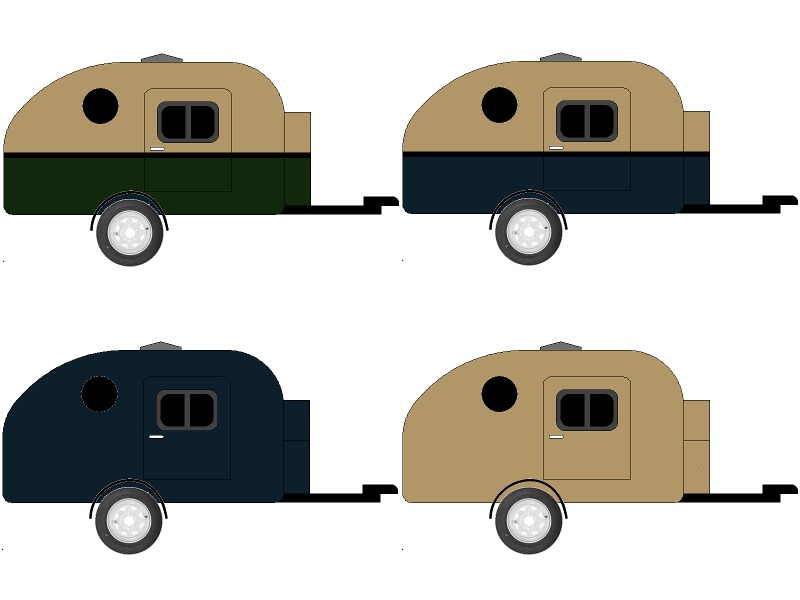
I've all but decided to paint the exterior. Fibreglass would be cool, but I like the idea of being able to change the exterior colours and style, for example if we buy a new tow vehicle we can paint it to match. So here's a few colour schemes I was toying with. The blue in these pictures is approximately (via RGB matching) the same as the honda "bali blue" of our van. Lots of time before I get to the point where I am ready to paint, so any suggestions anyone might have are welcome! Ha! I ended up doing all-fibreglass.
2012-10-13: Floor
With Andy's help, I have finished constructing the floor. It is made of a sandwich of 1/4" exterior ply, 3/4" 1x4 framing and another layer of 1/4" exterior ply, with some Dow TUFF-R insulation filling in the gaps. I read on some forums that 1/4" plywood would be too thin for this but I think with the "sandwich" approach using the hard foam insulation it has worked out well. I've probably saved 30 pounds versus using 1/2" ply for the floor and there is only a tiny amount of flex even when applying my full weight on a single foot to it. All that is left to do now is to apply 3 or 4 coats of epoxy to permanently seal the wood.
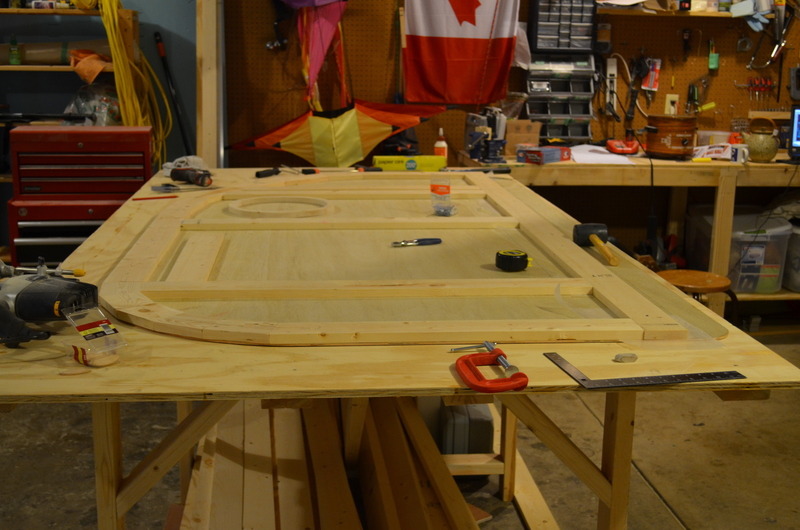
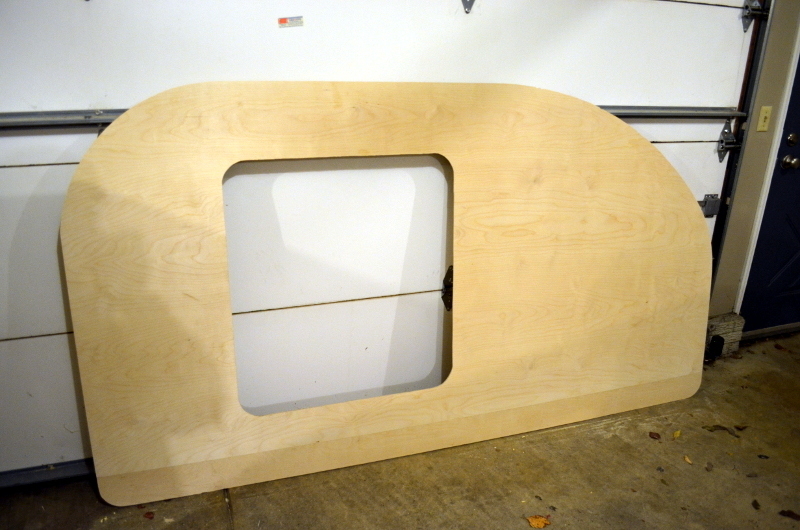
2012-10-13: Side Profile
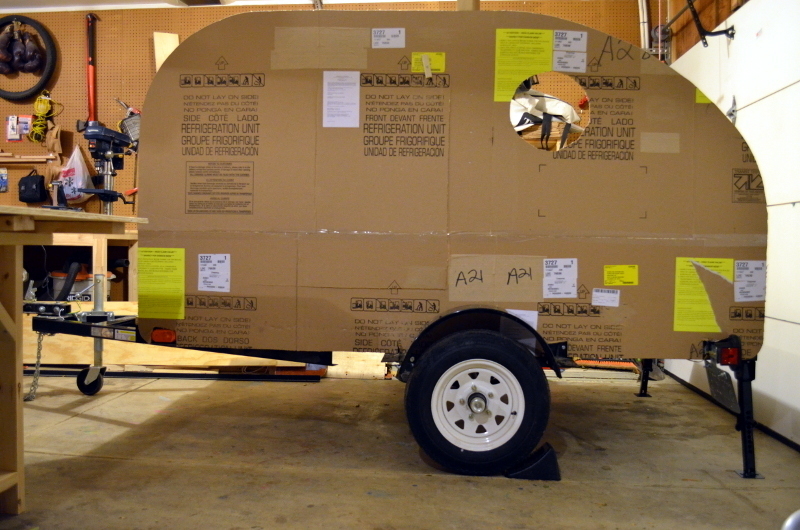
As you could see from the previous photo, I also took the opportunity to attach my previously made cardboard side profile to the frame and floor. Here's a better shot of it, giving an idea of where the door will be as well as Alexander's portal window. You can also see the levelers that Andy attached for me while he was here, they look and work great. Now the trailer doesn't tip backwards.
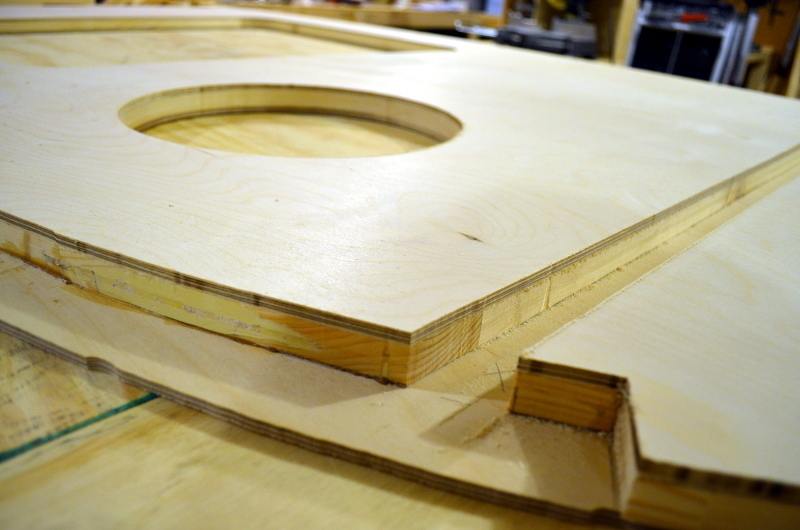
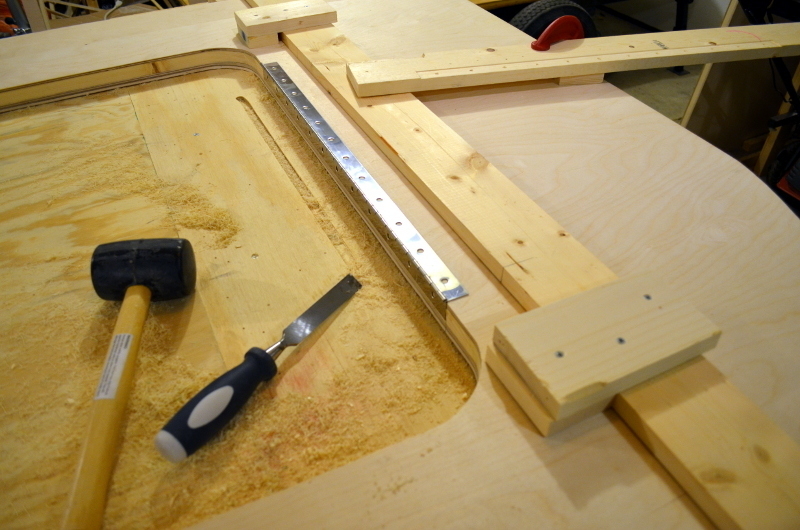
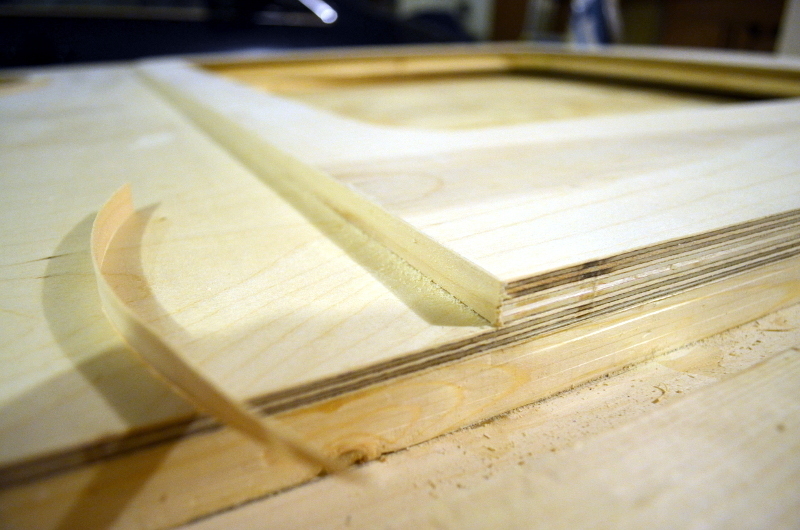
2012-10-21: Half Lap
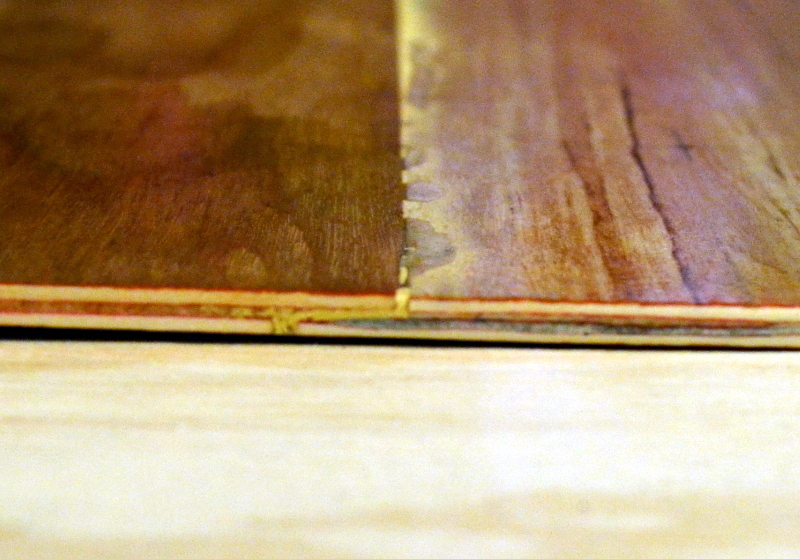
This is the (nearly in focus) results of a few days worth of tinkering with joining thin plywood. Scarfing turned out to be just too finicky so I ended up using a half lap. The strength of this joint is actually quite good. There is a 1/2 inch overlap on each side and glue the entire length of the panels. Now I just need to make or buy a better straight edge so that I don't end up with gaps needing filler. The whole reason I need to do this is that I didn't want to sacrifice head room inside the trailer in order to have walls that come down to cover the frame. This means the walls have to be about 4 inches wider than a standard piece of plywood, 52 inches instead of 48.
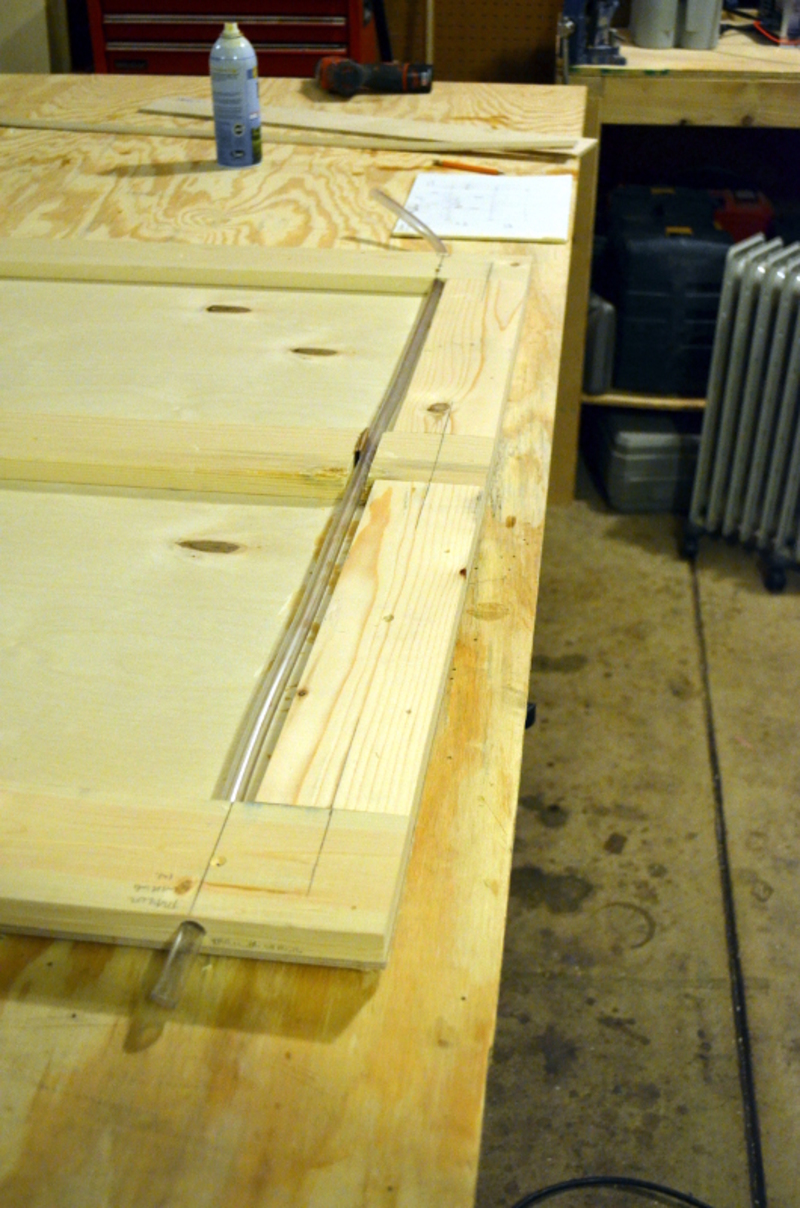
2012-10-21: Template

Here's the finished template in wood. I made it out of "lauan" which is an inexpensive ply made out of hardwood, and I've painted it with a couple of coats of poly to toughen the edges up a bit and get some idea of how it looks finished. Turns out I'm not sure I like the look of this wood finished, so I may still either paint the outside or see if I can find a supplier of better quality hardwood ply.
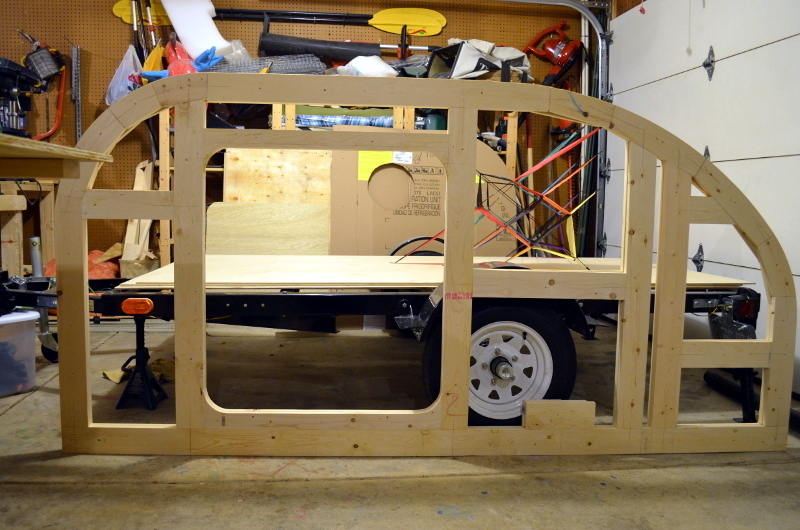
2012-11-01: Wall Frames
Here's the first wall frame in progress. The template from the previous step is underneath the frame and being used as a guide to lay out the frame. Eventually I will be cutting better quality plywood for the inside and outside walls and they will form a sandwich for which this frame is the filling.
2012-11-03: Wall Frame Completed
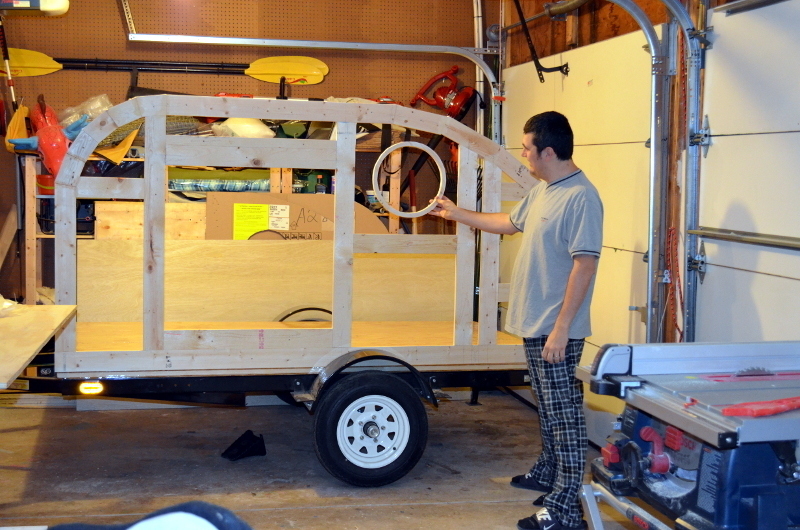
The first frame is now complete! The circular piece will be the surround for a round porthole window that will be at the head position of what we like to call 'Alexanders shelf'.
2012-11-14: Route Door Frames
Finally got around to routing out the proper shapes for what will be the door frames. Also got a chance to go pick up some baltic birch that I will be using for the walls and the main (and only) bulkhead. Looks a lot better than the cheap lauan.
2012-11-21: Outer Wall Skins Shaped
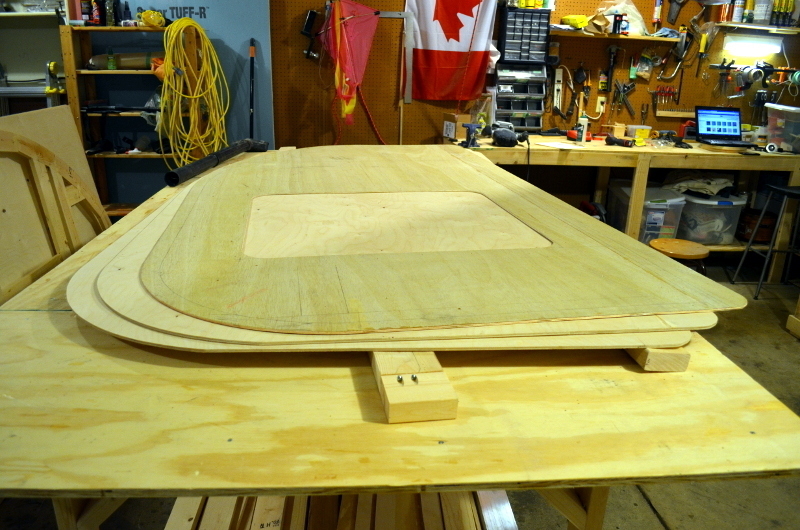
Finally got a chance to route out the skins to shape tonight. The template I made previously is the one sitting on top, and the two side wall outer skins are underneath. It took me a long time to get the individual sheets of baltic plywood to the right size (using the half lap as I mentioned earlier), but now it's finally done and the skins are routed out. Next up I will test fit the wall frames to the skins and do a lot of sanding and filling.
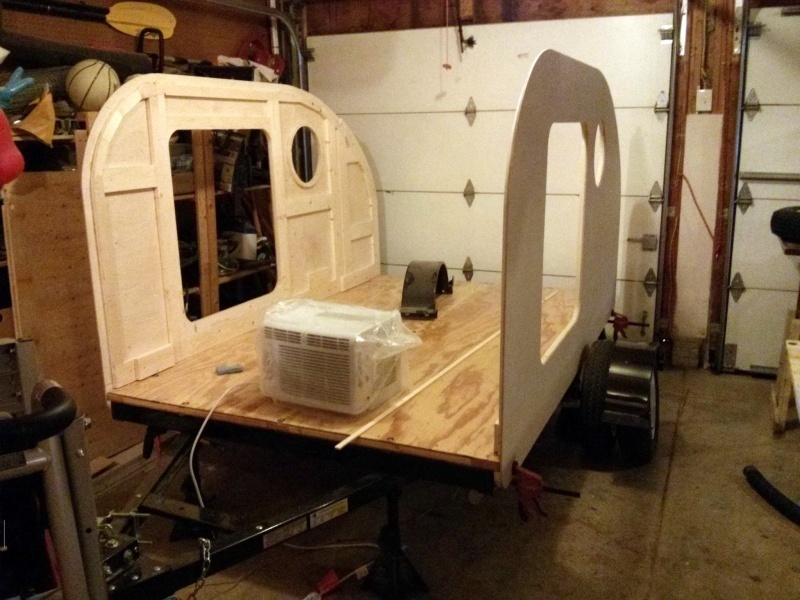
2012-11-21: Air Conditioner
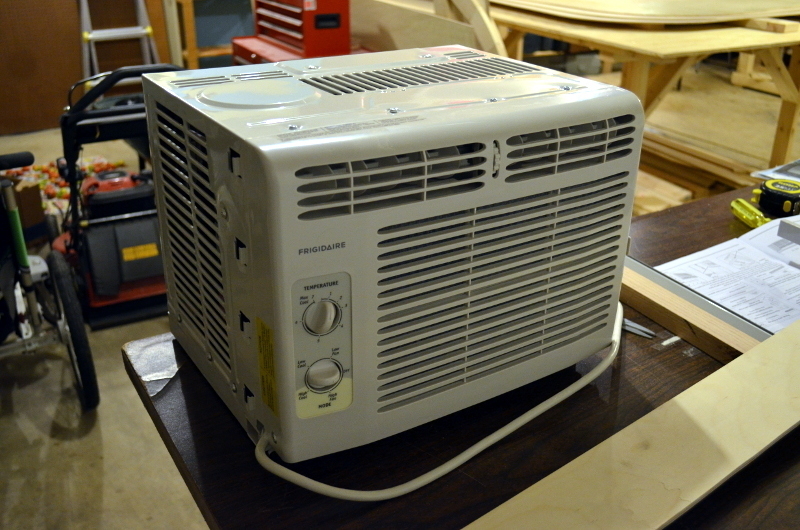
The air conditioner arrived and I can finally start measuring and figuring out how I will mount it into the front wall of the trailer. This is the smallest, most energy efficient unit I could find (at a reasonable price). Right now my plan is to put an appropriately sized hole in the front of the trailer and enclose the outer side of the air conditioner with a hinged cover. When the A/C is not needed, I will have an insulated plug and the space will become a storage compartment.
2012-11-24: Spar ledge

Making some more progress on the walls. I've cut out the ledge from the frame upon which the spars (the spans of wood that hold up the roof) will rest. This picture shows both frames screwed together to get them to be exactly identical. I ended up using my jig saw and that ended up requiring me to use a lot of wood filler and doing a lot of sanding to get the same smooth finish I had gotten with the router. If I ever build another one of these, I'll just spend a bit more for a good router bit to do this correctly.
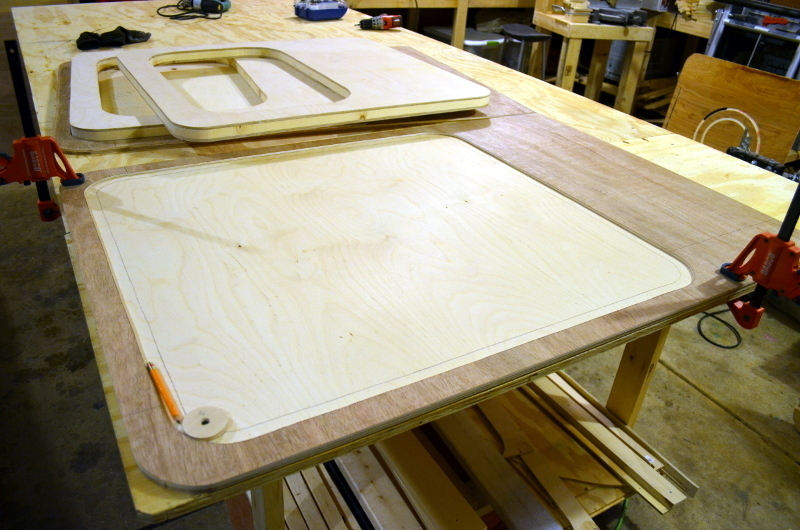
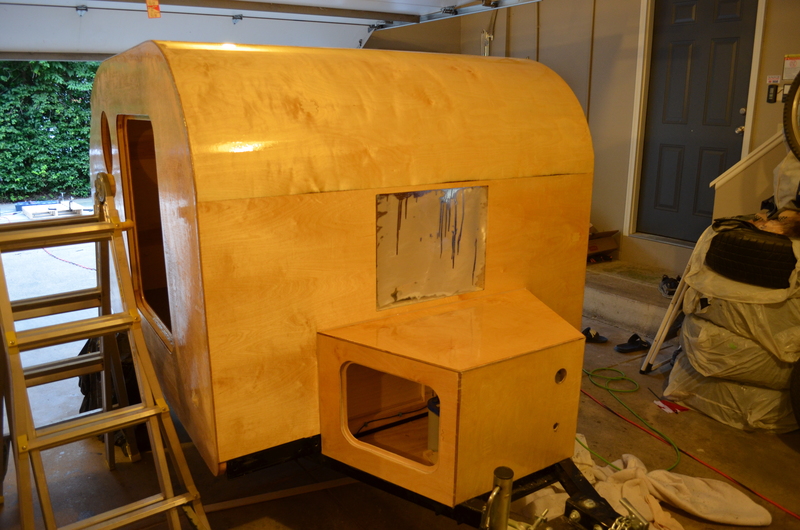
2012-11-24: Door hole
La-dee-da, it's a door hole. I found a nice way to cut out the door holes that allowed me to save the cut out piece to be used as the skin for the door itself. I used a jig saw for the whole thing, giving me a nice thin kerf all the way around, and I actually cut them by eye. The key was starting the cut with three holes drilled with a 1/16 inch drill bit. This left no tell-tale circular spot at the start of the cut. After sanding I ended up with mostly a 1/8 inch space all the way around which I think is just about right. Sadly, it looks like depending on the angle you look at it, the two sheets of plywood I joined to make the extra wide wall skin have different hues of brown, so now I'll have to decide whether to use them as they are or to stain them or to just paint them outright.
2012-11-24: Door window layout
With the doors cut out, I got a chance to lay out the placement of the sliding windows I had previously bought. They're pretty big, but I think a 2 and a bit inch space around them should be enough for an adequately thick wall. Once I have cut the window hole, I'll frame the inside and route it to shape as I did with the wall frame, then it's time to start the process of gluing up the outer skins to the inner frames.
2012-11-27: Door Skin Gluing

Here's a neat shot of the clamping system I used for getting the skins glued down to some 1x4 framing. On the one edge where I could, I used regular clamps against the table. Unfortunately the other three sides of each door required the use of small pieces of scrap wood that I screwed down right into the work table itself. I used a *lot* of them to make sure that the skin was secured firmly all the way around and inside the window.
2012-11-29: Inside the Door

This picture gives a good view of the frame I made to match the wall. It also happens to make for a very solid door and also provides a spot to put some more insulation. The little extra block in the centre space is there to provide solid wood for the door handle to (eventually) be screwed into.
2012-11-29: Two Doors

Here's a shot of both doors skinned and trimmed up around the edges using the router. I use the little electric heater to keep the garage (luckily insulated) up slightly above 10 degrees celsius while I am guing stuff together so that the glue will setup properly. Next up I will begin the process of gluing the wall frames to the outer wall skins. I'm probably going to need a *LOT* more scrap wood for clamping, so it might be time to go for a pallet run.
2012-12-02: Wall Glued to Skin

This weekend I managed to glue up both walls to the exterior skin plywood I had made earlier. Good thing I bought a lot of clamps, because I used almost all of them. For fun I made a time lapse video of the two person process of gluing and clamping a wall panel. It spans about an hour of work, or so. Unfortunately it cuts off just before I add the last couple of clamps...
2012-12-14: Battery
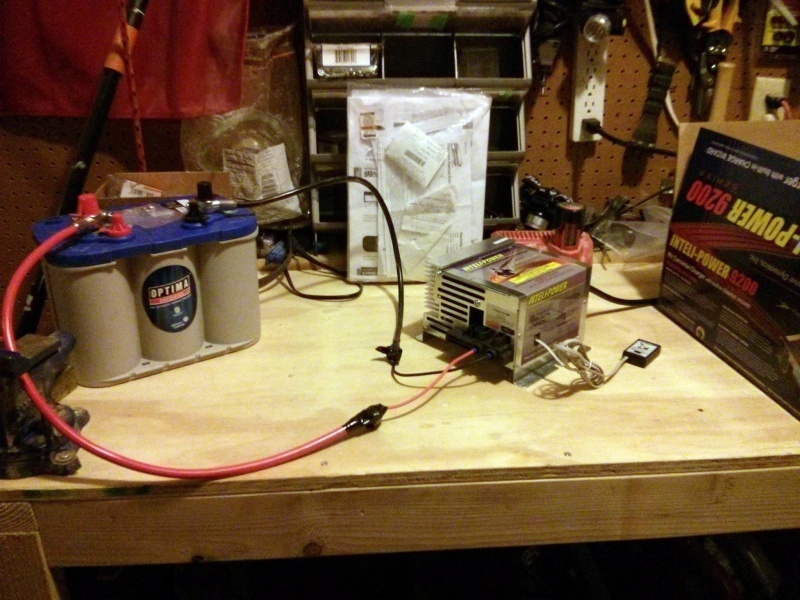
Sorry about the quality of this shot, I took it with my cell phone. I bought a deep cycle AGM battery from a local auto parts store. Hooked it up to the charger I had bought from amazon previously to keep it in good condition until I get the wiring done on the trailer. I have finally ordered most of the other electrical parts I will need for the 12 volt system and the running lights so once I have figured out how I will wire the 120 volt system things should start to progress on the body a bit faster.
2012-12-14: Test fitting the walls
I glued up the bottom rails of each wall and temporarily attached them to the trailer floor. The fit worked out really well and it is finally starting to look like what I envisioned from the beginning. Next up I have to run the wires and then glue up and trim the interior skins of the walls and doors. Then I can attach them more permanently and start working on the interior ceiling and spars.
2012-12-18: Electrical Parts
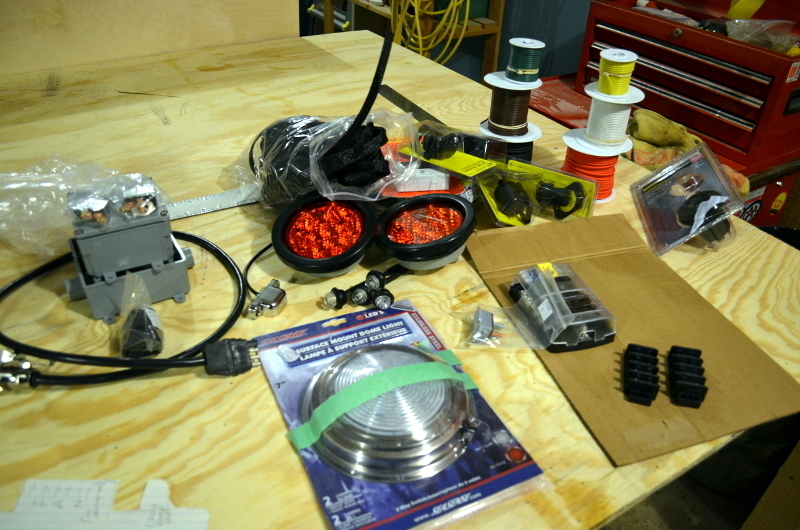
Well most of the electrical parts have arrived. I'm still waiting for a couple of items (including a neat little self contained digital voltmeter readout so I won't need to lug a multimeter around in the trailer) but I have started putting doing the circuit diagrams and building a cardboard mock up of the tongue box that will house the heart of the AC and DC systems. As part of this I also spent some time calculating what the weight on the trailer tongue would be if I put 100 extra pounds of weight right up front and it seems like it will actually help. My estimate of the final weight of the whole thing is about 1200 pounds. Not bad, but more than I was hoping it would be less. It'll be interesting to see how accurate my estimate is once it is done and I have it weighed again. One thing I am having trouble with is picking a light for the galley. I'm going to have to scour the web for ideas from other people's builds.
2013-01-19: Inside Skin
After a fairly sizable break during the holidays, I've gotten back into doing some solid work on the trailer. Here I've pictured the newly glued inside skin. I first ran a couple of small conduits for the trailer running lights and then glued down a full sheet of plywood to the inside of the frame. Once that was set, I used the router to trim off all the excess around the door holes, windows and body. In this picture you can see the portal window hole and the channel within which the bulkhead will slide. The bulkhead is the wall that separates the main cabin from the galley and holds the entire trailer square. You can also see some of my crappy routing skills in those bite sized chunks of plywood along the edge of the outer frame (the bottom in side in this picture). Hopefully once I do the roof I'll figure out a way to hide these mistakes. The doors themselves were done separately and turned out pretty good, considering I'd never done this before.
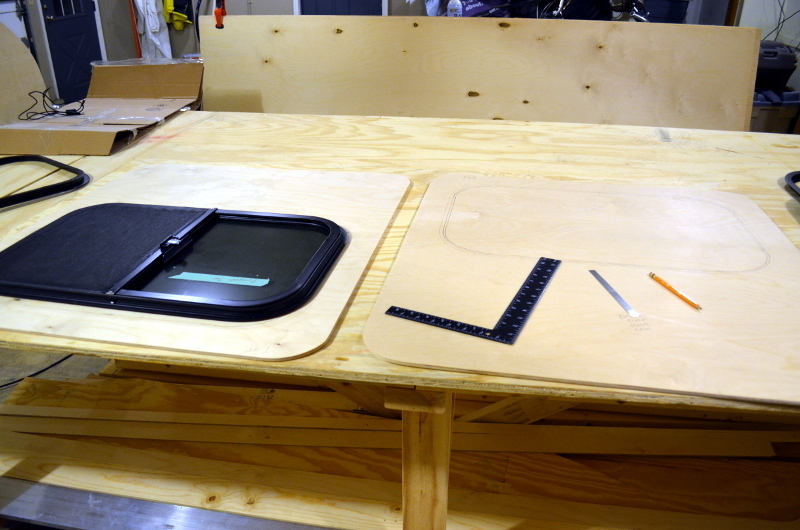
2013-01-20: Portal Window Spacer
The portal windows that I am using require a thicker wall to install than the ones I have build (1.5" vs 1.25"). To adjust for this, I added a quarter inch piece of trim ply around the window frame on the inside. The hole looks weirdly thick here only because both walls are stacked up side by side. The nice thing about this is that it will match up well with the trim that I need to add around the door to provide a sealing surface for water tightness. I am considering staining these pieces slightly darker than the rest of the interior birch to give it a nice contrast.
2013-01-21: Bulkhead

I finally started on the bulkhead. I assembled a frame from 1x4's in much the same way as I did with the walls, however this one was much easier as it is all right angles. Pictured here are the clamps holding down the first plywood skin. Since the edges on either side will be hidden within the recesses I built into the walls, I just used screws to hold them down rather than clamps. Once that dried, I trimmed the plywood down using the router so it matches the frame perfectly all the way around. All told, this piece has come together *much* faster and with higher quality than previous parts which I think is due to a simpler shape and lots of "practice" mistakes.
2013-01-22: Wiring Channel
Here you can see a wiring channel that I have installed within the bulkhead before adding the insulation and plywood skin. This channel will hold the wiring for the brake and rear running lights. I also added a channel for an AC outlet as well as a couple of DC outlets (one on the sleeping side and one on the galley side) and the light which will eventually end up in the hatch.
2013-01-27: Door Seals
With the bulkhead insulated and interior skin applied, I moved onto the door seals. This is a pair of carefully cut out plywood gaskets that go around the inside edge of the door openings. The first one provides a 3/16" gap and the second one provides a surface upon which the weather seal material can be applied such that when the door is closed it will form a complete seal all the way around. Pictured here is my marking off the second gasket layer 3/4" inside the opening all the way around using the first gasket (the one that sits flush and just provides room for the seal to sit) as the template.
2013-01-29: Hinge Mortises
So I decided upon using stainless steel piano hinges and tonight I managed to get the mortising done on the two walls. This is one of the last steps before I can paint the parts I have now built (doors, walls and bulkhead). Now I really really need to decide what to do with the outside. Paint or stain...
2013-02-15: Edging
To hide the ugly plywood seams on the inside I used some iron-on birch edging. Hopefully the hot glue will be strong enough to hold, but a few coats of helmsman spar varathane should help. I think the next step is the one I have been dreading: I need to paint the exterior walls, meaning I have to decide how to finish them.
2013-03-03: Preparing for Fibreglass
I've finally settled on just doing a plain fibreglass finish of the raw wood. With that decision made, I laid down an initial coat of straight epoxy onto the wood and once that was partially cured I laid out the fibreglass cloth onto the side. This is the point at which I realized that I didn't have nearly enough epoxy to do both walls at the same time, so I will just do this one while I wait for a new shipment.
2013-03-15: After Epoxy Fill Coat

This is what the fibreglass looks like after the fill coat. As this is the very first time I have ever done this, you can sort of see all the dimples and uneveness. I hope I can fix that with a lot of sanding, and that as I get experience I get better at doing it.
2013-04-10: Cut Out Hatch Edge
After a bit of a delay due to some non-trailer related issues, I have returned to two fully cured, fibreglassed walls. The next critical step at this point was also a real nail biter. The idea here is to cut out (using a jig saw, what else) the outside edge of what will eventually become the hatch. So I basically had to lay out and cut a 2 inch strip of wood from my painstakingly built walls. Well it's done now and I think it turned out okay. I actually ended up using a "general purpose" blade in the jig saw because the fine woodworking blade I bought was too flimsy to cut evenly through two layers of baltic birch surrounding the 3/4" fir frame. The next step will be to do some finishing work on the inside walls (one more sanding and painting with helmsman spar) and apply graphite-blackened epoxy to all the visible edges and seams. Plus some clear epoxy for various areas like the inside frame of the window, etc. Just enough to fully seal the wood. Once all these smaller tasks are complete, it will be time to start assembling the walls and bulkhead. I cannot wait!
2013-04-24: Second Test

This picture looks a lot like a previous picture, but I've accomplished a lot more work on the walls and bulkhead. I've finished the initial exterior and interior painting and I've done things like drill out the holes for the fender mounts. All that is left to do is some final light epoxying of the edges here and there and the walls will finally be ready for permanent mounting to the floor.
2013-05-05: Walls
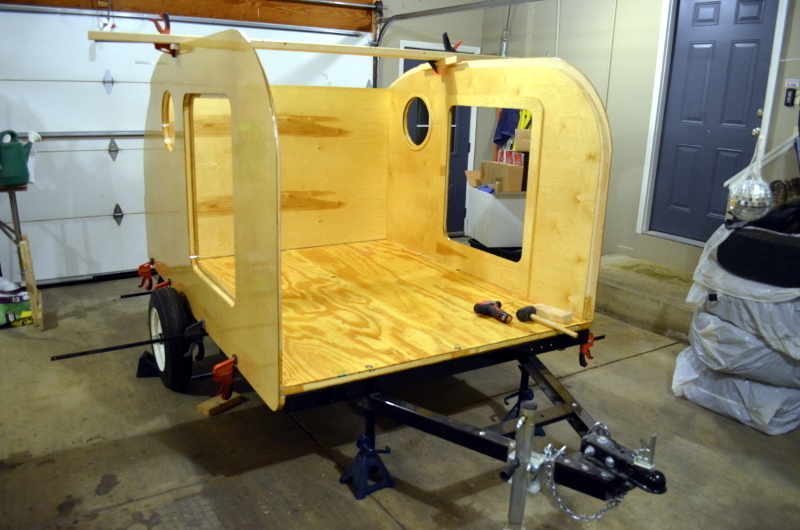
Milestone achieved! I finally had enough of touching up the sides so I decided to just go ahead and permanently attach the sides and the bulkhead. I laid some PL premium into all the channels between the floors, walls and bulkhead and slid it all into place. Then I used stainless steel deck screws to attach the walls to the floor via the pocket holes I had previously drilled out. I only needed the one brace across the top to hold it square and true. Not bad if I do say so myself!
2013-05-10: Spars

To create the spars, I bought regular quality pine boards in 1"x4" (actually 0.75" x 3.5") and ripped them down with the table saw to make two 0.75" x 1.5" pieces which I then glued and screwed together to make square-profiled beams of 1.5" x 1.5". Once they were all complete, I trimmed them to fit at each specific position along the main section of the ceiling as you can see in the picture. 10 spars in total (one made of oak to hold the hinge for the rear hatch) actually didn't take that long. I also picked up some bending birch to use for the inner ceiling and I am working on trimming them to size in preparation for installation.
2013-06-08: Ceiling Complete
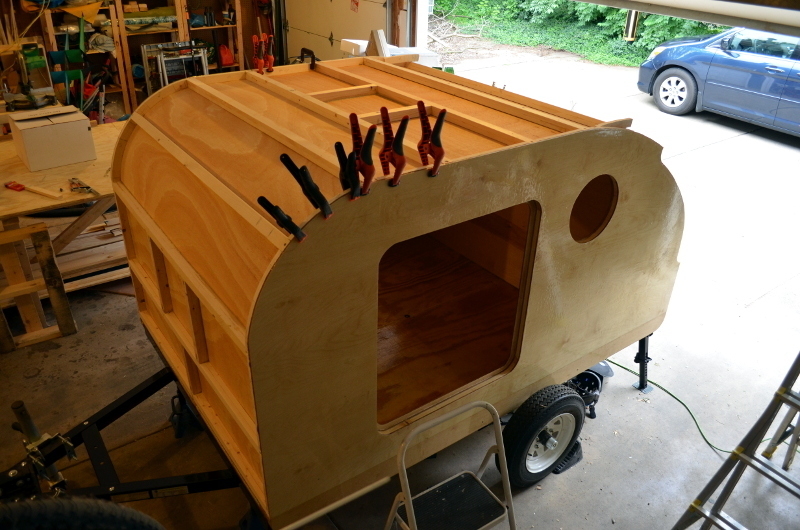
This is an exterior shot of the completed ceiling. There are still a couple of clamps holding down the blocking that was run all the way along the inside edges. These will provide a nailing surface for the roof material once I eventually get to that. In this shot you can also see the framing that I installed for the air conditioner (front) and ceiling fan (top). The next step will be to run all the trailer wiring, both 12 volt and 120 volt, and then to install the insulation on top of that.
2013-06-08: Forward Ceiling

And here's a shot of the forward section of the trailer. I did a much better job joining up the sheets here, but for consistency I will also cover the seam with a fir strip.
2013-06-08: Aft Ceiling

Here's a shot of the rear section of the ceiling in place from the inside of the trailer. Here you can see the striping that I wasn't too pleased with in that expensive bending birch. I think next time at the very least I will get barrel oriented bending birch which would allow those stripes to orient from side to side rather than from front to back. I bought column bending birch expecting it to be more flexible in the direction I needed but the stuff was equally flexible in both directions. In this shot you can also see the joint where two sheets meet up. Unfortunately they did not meet up as nicely as I'd hoped so I'll just cover it with a small strip of fir which I will glue on and paint as one of the final steps much later on in the project.
2013-06-22: Galley

Here's a shot of the galley area and the work I have done recently. The first thing was to build out the back wall where the tail lights and license plate will be mounted. While I was at it I also added a divider to separate the storage area into two sections. With that part complete I then started on building the hatch. This design requires a number of pieces of plywood all carefully cut so that they match up exactly with both the outside and inside dimensions of the wall section I cut out earlier. Once these are done, I will be able to glue them all together and begin installing the spars and skinning the inside of the hatch. My design for the galley actually differs from most home made teardrops in that the hatch only goes half way down the side of the trailer and the storage area will actually be accessed via lids that hinge upwards from above. This design will maximize the limited space we have here for keeping the various camping supplies, but still provide a full five foot wide counter space. I will also be putting a shallow shelf near the top of the galley area to provide storage for smaller stuff and a place to hang the paper towel dispenser, etc.
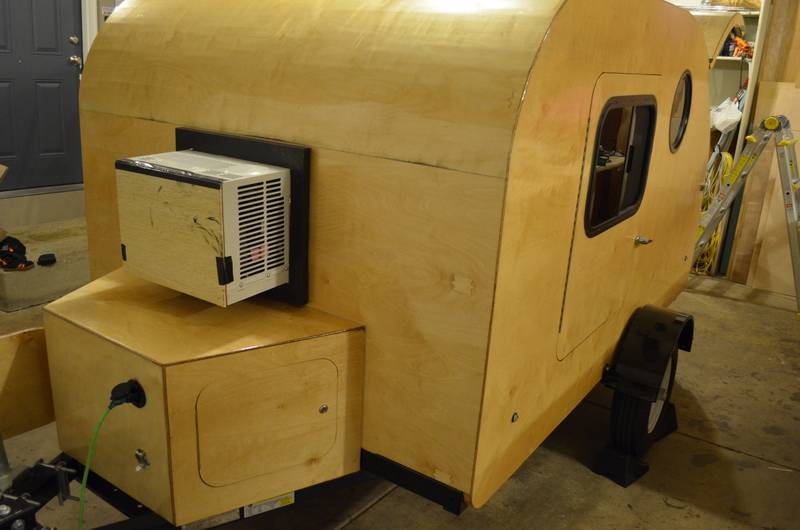
2013-07-03: Air Conditioner
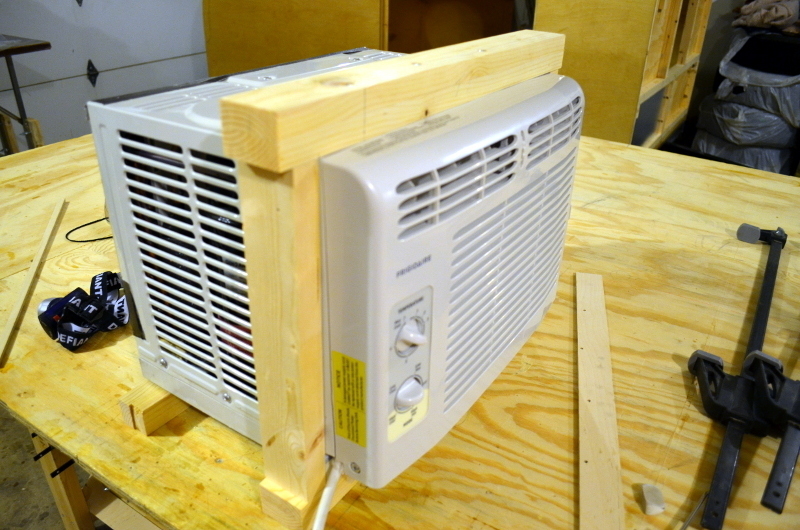
I spent some time designing and constructing the surround for the AC unit that will be going in the front of the trailer. I had to modify the AC unit a bit to get enough solid spots to drill screws into to hold the surround in place, and of course to maintain that ever so slight downward slope that an AC unit requires to function properly. The nice thing about this setup is that I will (eventually) be able to build a little storage cabinet that will fit into the same hole but without the AC in it for when we go camping in cooler weather.
2013-07-09: Wiring and Insulation

One layer of insulation is done. I am using insulation that has tin foil on the outside face which helps increase the R value and blocks any stray mind control rays. I tested it and it seems PL premium does indeed stick well to the metallic side, but not the blue plastic film from the rear side of the insulation, which I can just peel off anyway. Surprisingly, a 1" kerf was easily enough to allow this insulation to bend around the tightest curve on the trailer, in this photo that's the top part above the AC hole. Once I finished the first insulation layer, I ran all the wiring for the 120 volt and 12 volt systems. I used 12 guage wire for the 12 volt outlets, and 16 guage for everything else. For the 120 volt system I used outdoor grade bonded wire and wall mount outlets which I covered in hollowed wood shells. The next step will be to add a second layer of insulation and then start building the tongue box to hold all the electronic components. once the box is complete, I can skin the outside of the trailer and put it all together.
2013-07-16: 120 volt

The 120 volt system is wired and verified! It was a bit of a struggle because I used 12 gauge wire instead of 14, but it's all good in the end!
2013-07-20: Help Arrives
With Andy helping, things are going a lot faster. Here you can see him working on the air conditioner while I glue up the outer skin to the hatch. I think I used a bit too much pressure on the straps and it affected the curvature of the hatch a bit, but it turned out pretty good.
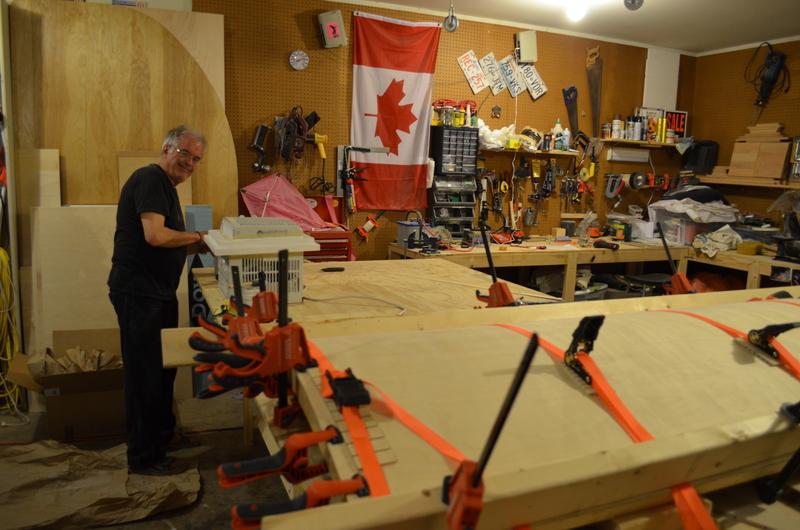
2013-07-20: Outer skin
With all the wiring done and tested, it is time to do the outer skin of the roof. It is a single layer of 1/4" baltic birch that we kerfed using the table saw and glued down with PL premium. Here you can see how we held it down using ratcheting straps. This method worked just about perfectly. It saved time and the joints matched up really well. I went though a lot of PL premium here... if I did something like this again, I'd probably buy a whole case ahead of time.
2013-07-21: Tongue box
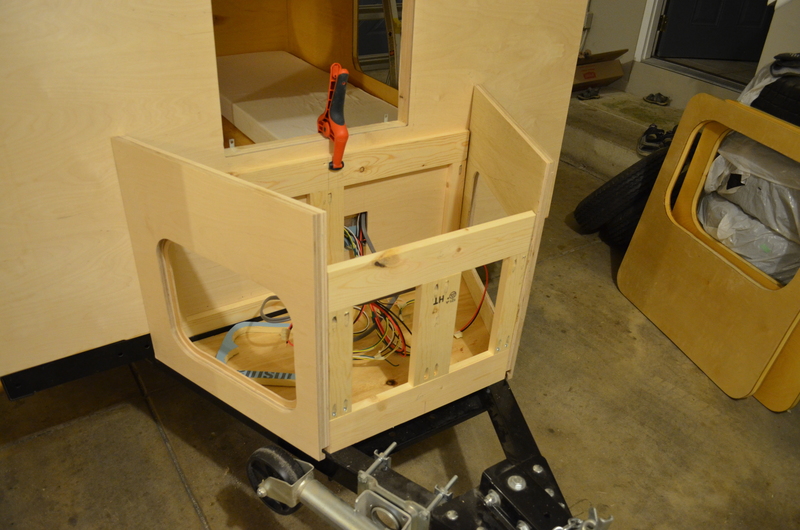
With the outer layer glued on, we moved on to building the tongue box to hold all the electrical components with space left over for some storage.
2013-07-24: Final electrical connections
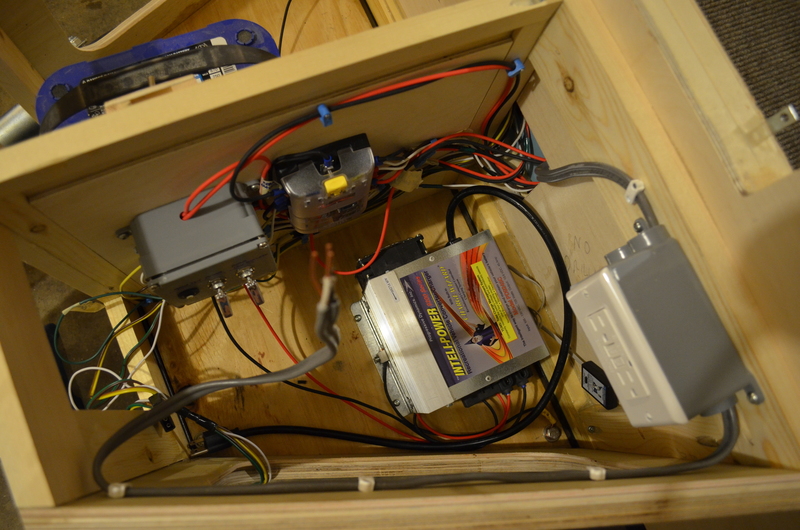
Here you can see the final electrical connections. I wired it all up before closing in the tongue box, just to make it a bit easier to access. I used up a lot more space than I had hoped but it all works perfectly so I think it was worth it. The other side holds the battery in a vented compartment and the master power off switch, plus it provides space to hold an extension cord and wheel chocks.
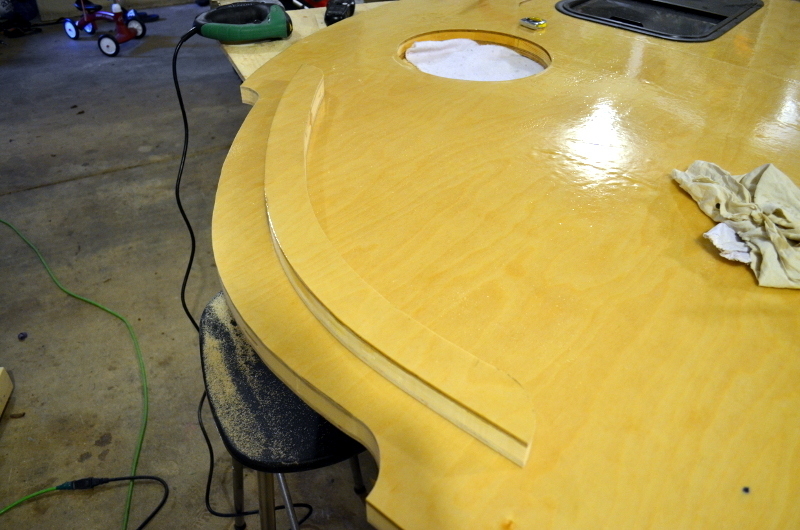
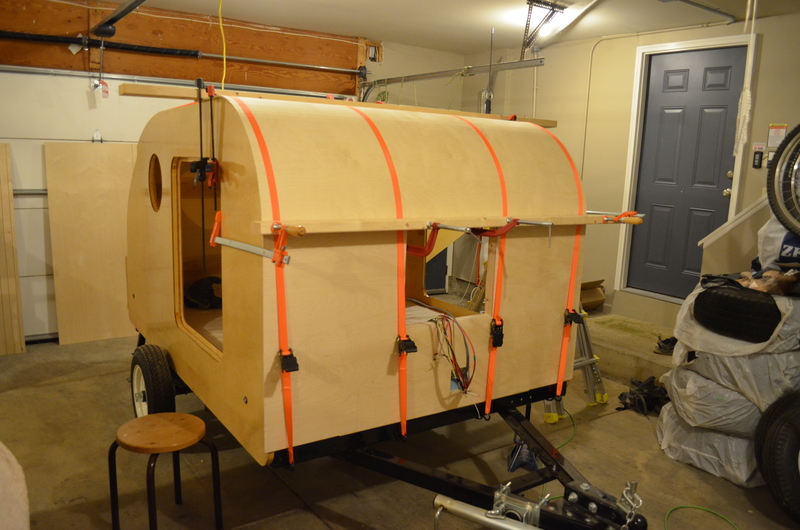
2013-07-26: Exterior fibreglass
With the exterior fully skinned and the tongue box built, it was finally time to do the topside fibreglassing. This went a lot faster than the walls because of Andy's help and I used a lighter cloth.
2013-07-28: Final details
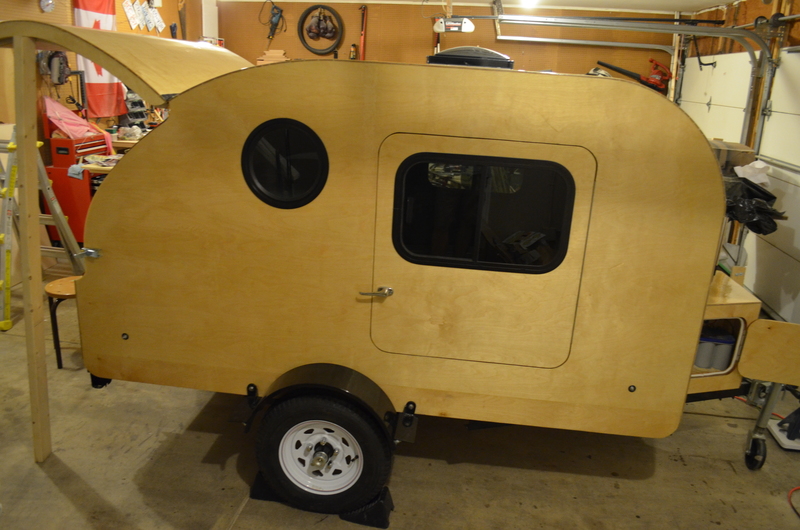
With the fibreglass done, it was time to add the doors, windows, seals, lights and some interior finishes. We built a shelf inside for Alexander to sleep on and did some final paint touchups.
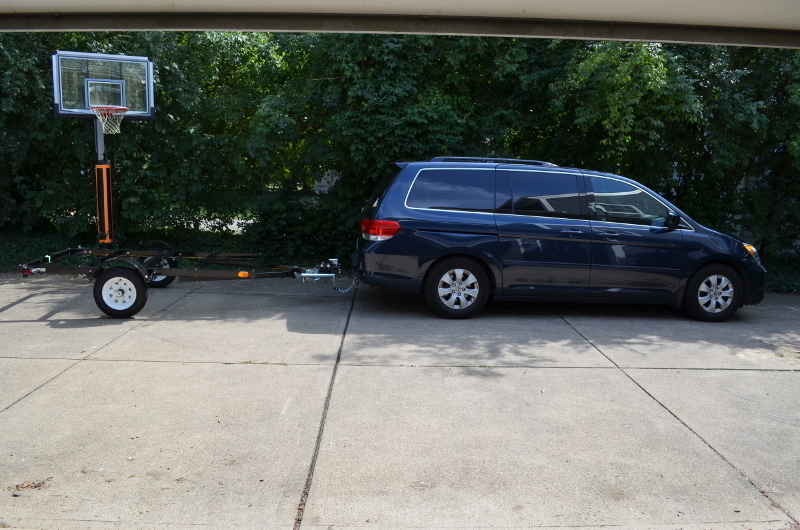
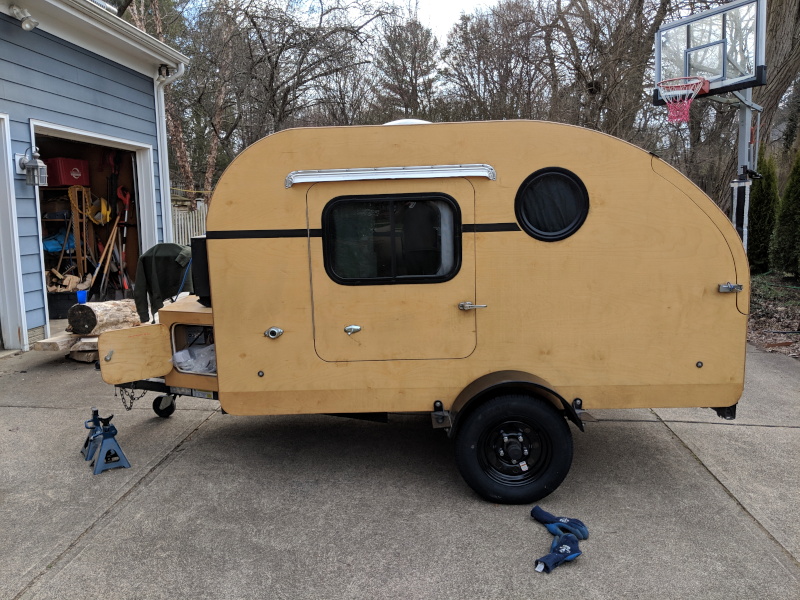
2013-07-28: Complete
And here she is! With the air conditioner mounted and wheel fenders attached we took her for a test drive and she handled beautifully! This was exactly 24 hours before we were heading out to yellowstone! More pictures coming up!
2014-06-28: Camping
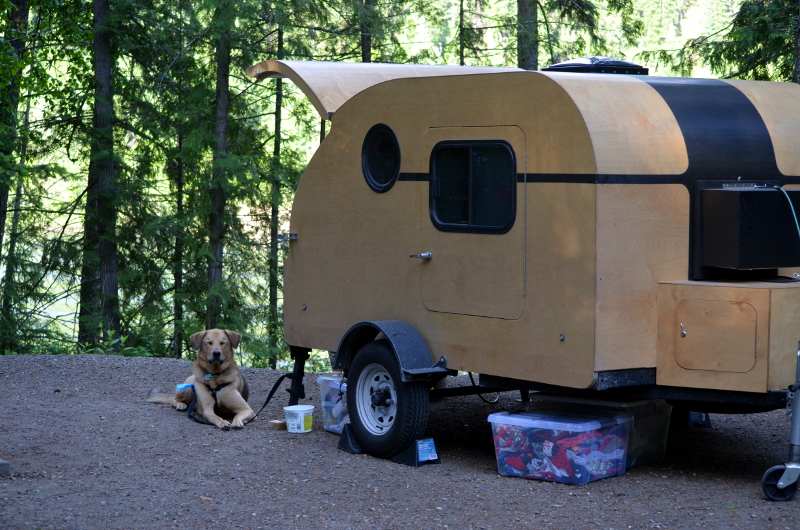
A year later, I finally got a chance to apply the third coat of epoxy and some racing stripes to make it go faster. This is a shot of my cute dog Pax that happens to capture the detail of the stripes and the black cover I keep on top of the air conditioner when we are not using it. This shot was taken at Wells Gray Provincial Park in BC.
2014-07-28: Kitchen in Use
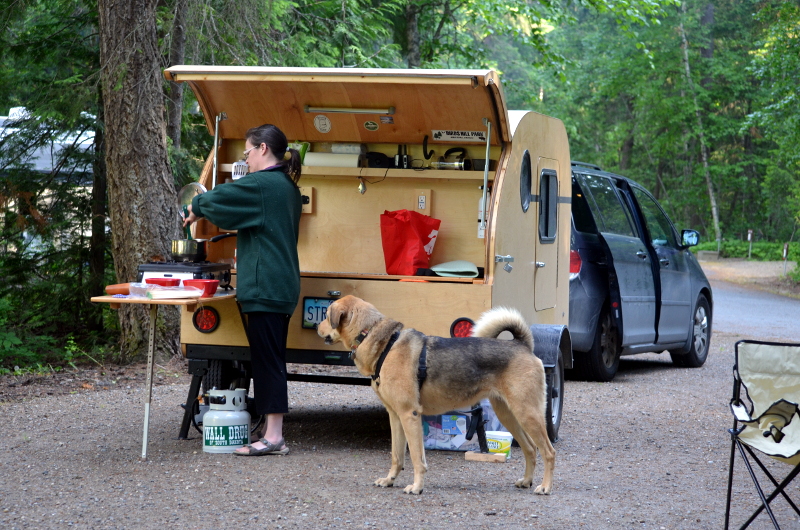
This is a shot of the (mostly) finished kitchen in use. Here you can see Adriana, as well as the little side table for holding the cooktop and the storage shelf.
2014-09-10: Alexander's Shelf
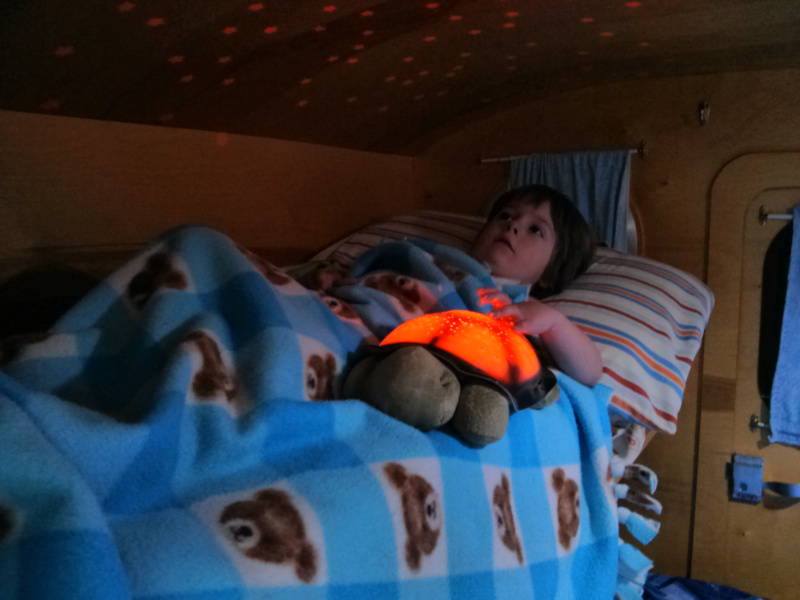
Here's a shot of Alexander enjoying his sleeping shelf. We sleep in the queen size bed underneath.
2019-05-15: 2019 Update #1
The time has come to replace the tires and I decided to switch over to steel belted radials with a lower pressure. This improved the ride of the trailer and reduced the amount of heat generated substantially. I also took the opportunity to switch to black painted wheels.
2019-09-01: 2019 Update #2
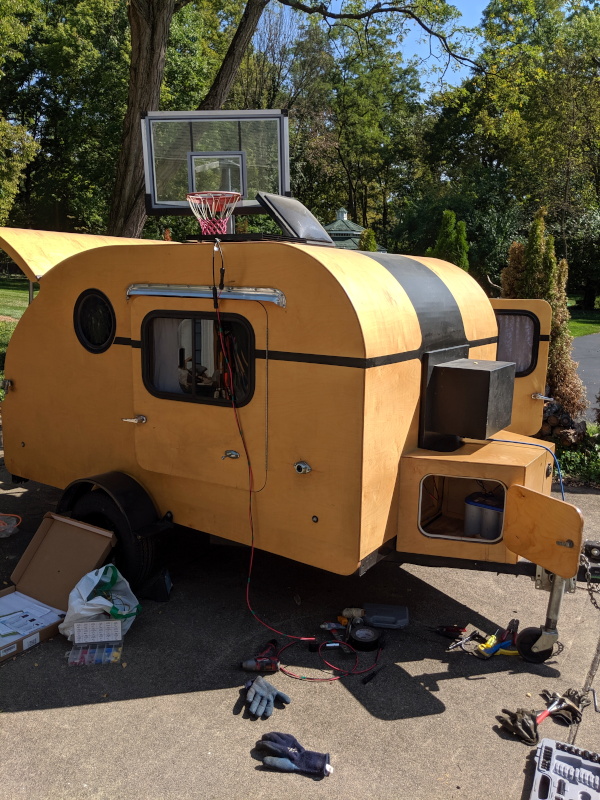
I added a solar panel and charge controller for keeping the battery topped up when we are camping off-grid.